If your custom-built gaming PC suddenly refuses to post, displays a black screen after an ambitious RAM overclock, or gets stuck in an infinite boot loop, learning how to clear cmos on a modern gaming motherboard is your first line of defense. The CMOS (Complementary Metal-Oxide-Semiconductor) chip stores crucial BIOS configuration data, including system time, boot order, and hardware voltage profiles. Resetting this memory wipes out corrupted settings and restores your motherboard to its safe, factory-default state.
While clearing the CMOS is a standard troubleshooting technique, doing it incorrectly can lead to serious hardware damage. Modern motherboards are highly sensitive electrostatic devices. Slipping with a screwdriver while trying to bridge jumper pins can scratch the delicate trace lines of a 12 x 9.6-inch ATX circuit board, permanently killing it. Failing to completely discharge residual power from a high-wattage 850W power supply before touching internal components can also send a fatal static shock through your CPU or memory controller. To protect your investment, you must follow a methodical, step-by-step approach.
As an Amazon Associate we earn from qualifying purchases at no extra cost to you.

Our Top Picks
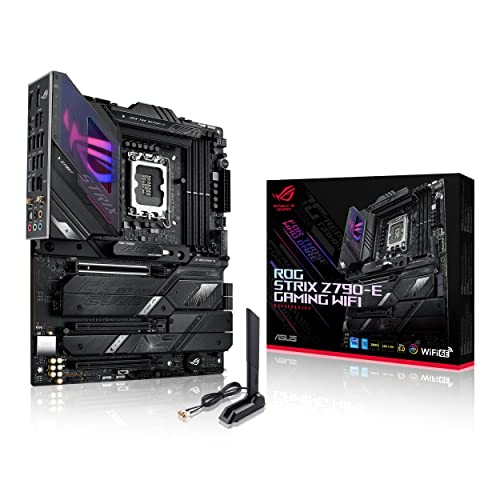 ASUS ROG Strix Z790-E Gaming WiFi 6E LGAZ790-E|M.2 x5|WiFi 6E|ATX10.75 x 3.03 x 13.5 Inches0.7 poundsCheck on Amazon

What You Need
Before opening your PC case, gather the necessary tools. Having the right equipment on hand prevents improvisation, which is where most hardware damage occurs.
| Item | Why You Need It | Optional or Required? |
|---|---|---|
| Flathead Screwdriver | Used to bridge the two CMOS jumper pins or gently release the battery clip. Use a small, non-magnetic 1/8-inch flathead. | Required (if your board lacks a dedicated button) |
| CR2032 Lithium Battery | The standard 3V coin-cell battery that powers the CMOS memory. Keep a fresh one handy in case the old one is dead. | Optional (only if replacing a dead battery) |
| Flashlight or Headlamp | Modern gaming motherboards feature dark, matte-black aesthetics that make finding small pin headers difficult. | Required |
| Anti-Static Wrist Strap | Grounds you to the PC chassis to prevent electrostatic discharge (ESD) from damaging microchips. | Optional but highly recommended |
| Motherboard Manual | Identifies the exact location of the “Clear CMOS” (CLRTC) pins or button on your specific layout. | Required |
Step-by-Step
There are three primary ways to clear the CMOS on modern motherboards. We will cover them from the easiest method to the most manual workaround. Choose the method that matches your specific motherboard’s feature set.
Method 1: Using the Case or I/O Panel Button (Time: 3 Minutes)
High-end modern motherboards, such as the ASUS ROG Strix Z790-E Gaming WiFi 6E (typically retailing in the $260–$290 price range), often feature a dedicated “Clear CMOS” physical button directly on the rear I/O panel. This makes troubleshooting extremely easy.
- Shut down the PC: Turn off your computer completely through Windows. Flip the rocker switch on the back of your power supply unit (PSU) to the “0” (Off) position.
- Unplug the power: Pull the main AC power cord out of the back of your power supply.
- Discharge residual energy: Press and hold the PC case power button for 10 to 15 seconds. This drains any electricity remaining in the motherboard’s capacitors.
- Press the Clear CMOS button: Locate the button on the rear I/O panel (it is usually labeled “CLR_CMOS” or features a circular arrow icon). Press and hold this button for 5 to 10 seconds.
- Restore power: Reconnect the AC power cord, flip the PSU switch back to “1” (On), and boot up your system.
Method 2: Bridging the Jumper Pins (Time: 5 Minutes)
If you are using a mid-range motherboard like the Asus ROG Strix B550-F Gaming WiFi II (priced in the $160–$180 range), you likely won’t have a rear I/O button. Instead, you will need to bridge the physical jumper pins located directly on the circuit board.
- Power down and unplug: Turn off the PC, switch off the PSU, unplug the power cable, and hold the power button for 15 seconds to drain residual energy.
- Open the side panel: Remove the tempered glass or metal side panel of your PC case to access the internal hardware.
- Locate the jumper pins: Put on your headlamp and consult your manual. Look for a two-pin header labeled “CLRTC,” “CLEAR_CMOS,” or “JBAT1.” On most ATX boards, these pins are located near the bottom-right corner or just below the primary PCIe graphics card slot.
- Bridge the pins: Take your flathead screwdriver and touch the metal tip to both pins simultaneously. Hold the contact steady for 10 seconds. Ensure the screwdriver does not slip and scrape against other components.
- Close up and boot: Remove the screwdriver, reinstall the side panel, plug in the power cord, turn on the PSU, and boot your PC.
Method 3: Removing the CMOS Battery (Time: 10 Minutes)
If you cannot locate the jumper pins or they are blocked by a massive graphics card, removing the CR2032 coin-cell battery will force the CMOS memory to clear by cutting off its constant power supply.
- Perform complete power-down: Turn off the PC, unplug the power cable, and drain the capacitors by holding the case power button for 15 seconds.
- Locate the battery: Open the case. The silver, coin-sized CR2032 battery is usually visible on the lower half of the motherboard. Note: If you have a large 300mm+ graphics card installed, you may need to uninstall the GPU first to access the battery slot.
- Release the battery: Use a fingernail or a non-conductive plastic tool to gently press the small metal spring clip holding the battery in place. The battery will pop up slightly. Lift it out of its housing.
- Wait for memory drain: Leave the battery out for at least 5 minutes. This ensures the volatile CMOS memory completely loses its electrical charge.
- Reinsert and reassemble: Push the battery back into the socket until it clicks securely into place. Reinstall your graphics card if you removed it, close the case, plug the power cable back in, and turn on the PC.
Mistakes to Avoid
- Leaving the power cable plugged in: Even if your PC is turned off, modern power supplies feed a continuous +5VSB (standby) voltage to the motherboard. Trying to clear the CMOS while the power cord is connected can cause a short circuit.
- Using magnetic screwdrivers carelessly: Strong magnets can interfere with delicate board components. Stick to a standard, non-magnetic or weak-magnetic tool, and ensure you only touch the designated jumper pins.
- Forcing the battery holder: The plastic housing holding the CR2032 battery is fragile. Forcing it with a heavy metal tool can snap the solder joints underneath, rendering the battery slot useless.
- Forgetting to re-enable XMP/EXPO: Clearing the CMOS resets everything. Your high-speed DDR4 or DDR5 RAM will revert to its basic, slower JEDEC speed (e.g., 2133MHz or 4800MHz). Once your PC boots successfully, you must enter the BIOS and re-enable your RAM’s overclocking profile to get your full gaming performance back.
How Often
Clearing the CMOS is strictly a reactive troubleshooting step, not a scheduled maintenance task. You should only do it when your system is actively failing to boot, after an unstable hardware overclock, or if a BIOS update fails to initialize correctly. Under normal operating conditions, you will never need to clear your CMOS. As we look ahead to 2026, modern motherboard architectures are becoming increasingly resilient with dual-BIOS chips and auto-recovery features, but manual clearing remains a necessary fallback skill.
When to Call a Pro or Replace
If you find that your computer loses its date and time settings every single time you unplug it, or if your custom BIOS settings keep reverting to default on their own, your CR2032 battery is likely dead. This is a cheap, five-minute DIY fix that costs less than $5 for a new battery.
However, if clearing the CMOS via the button, jumpers, and battery pull fails to resolve a “No Post” or black screen issue, you may be dealing with a corrupted BIOS chip or a dead motherboard. If your motherboard lacks a “BIOS Flashback” feature (which allows you to reinstall the BIOS via a USB drive without entering the system), you will need to contact the manufacturer’s technical support or a professional repair shop. If the board is physically damaged or out of warranty, replacing it with a reliable mid-range option like the Asus ROG Strix B550-F or a premium board like the ROG Strix Z790-E is your best path forward.
FAQ
Will clearing the CMOS delete my personal files?
No. Clearing the CMOS only resets the motherboard’s volatile hardware settings (like RAM speeds, fan curves, and boot order). Your operating system, games, documents, and personal files stored on your SSDs or hard drives remain completely untouched.
How do I know if my CMOS battery is dying?
The most common symptom of a dying CR2032 CMOS battery is your PC losing its system clock time whenever you turn off the power strip or unplug the machine. You may also see “CMOS Checksum Error” or “CMOS Battery Low” warning messages during the boot process.
What is the difference between clearing CMOS and resetting BIOS?
Clearing the CMOS is a physical hardware reset that cuts power to the chip, forcing it to lose its memory. Resetting the BIOS is a software-level action performed inside the BIOS menu by selecting “Load Optimized Defaults.” Both achieve the same setting reset, but clearing the CMOS is used when the system cannot boot into the BIOS menu at all.
Can I clear CMOS while the computer is turned on?
Absolutely not. Attempting to bridge the jumper pins or remove the CMOS battery while the system is powered on will cause an immediate electrical short, which can permanently fry your motherboard, processor, and RAM.