
Updating your motherboard’s Basic Input/Output System (BIOS) is one of the most critical maintenance tasks you can perform on a home computer. The BIOS is the fundamental firmware that initializes your hardware before your operating system even begins to load. While a successful update can unlock compatibility for newer processors, patch critical security vulnerabilities, and improve system stability, a failed update can be catastrophic.
If a BIOS update is interrupted, corrupted, or applied incorrectly, it can “brick” your motherboard. This means your $100 to $500 motherboard is rendered completely non-functional, unable to even start the boot process. Unlike a crashed operating system, which can easily be reinstalled, a corrupted BIOS often requires physical chip replacement, specialized hardware programmers, or a complete motherboard replacement. Learning how to update motherboard bios safely is essential for anyone maintaining a home office workstation or a custom gaming setup.
As an Amazon Associate we earn from qualifying purchases at no extra cost to you.
Our Top Picks


What You Need
Before you begin, gather the necessary tools to ensure a smooth, uninterrupted update process. Having the right diagnostic and power-protection hardware on hand can mean the difference between a successful upgrade and a dead system.
| Item | Why You Need It | Optional? |
|---|---|---|
| USB Flash Drive (8GB to 32GB) | Holds the BIOS update file. Must be formatted to the FAT32 file system so the motherboard can read it outside of Windows. (Price range: $5 to $15) | No |
| Uninterruptible Power Supply (UPS) | Provides battery backup power (typically 500W to 1500W) to prevent your PC from shutting down if a power outage occurs mid-update. (Price range: $80 to $250) | Yes (Highly Recommended) |
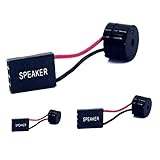
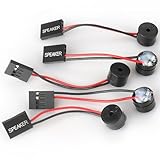
| Motherboard Diagnostic Speaker | Provides audible beep codes to diagnose errors if the system fails to POST (Power-On Self-Test) after the update. Excellent options include the SoundOriginal PC Motherboard Internal Speaker (3-Pack) for around $5, or the 5 PCS Motherboard Speaker set for around $4. | Yes (Essential for troubleshooting) |
| A Stable Internet Connection | Needed to download the exact BIOS file from your motherboard manufacturer’s official support page. | No |
Step-by-Step
Follow these steps carefully. Do not rush any part of the process, and ensure your workspace is free of distractions.
Step 1: Identify Your Current BIOS Version & Motherboard Model
Estimated Time: 5 minutes
You must find your exact motherboard model and its current BIOS revision. To do this in Windows, press the Windows Key + R, type msinfo32, and press Enter. Look for the BaseBoard Product (your motherboard model) and the BIOS Version/Date. Note these down. Alternatively, you can find this information printed directly on the physical motherboard surface, usually near the PCIe slots.
Step 2: Prepare Your USB Flash Drive
Estimated Time: 5 minutes
Insert your USB flash drive into your computer. Open File Explorer, right-click on the drive, and select Format. Under the File System dropdown, select FAT32. Leave the allocation unit size at default, check “Quick Format,” and click Start. Warning: This will erase all data on the USB drive, so ensure any important files are backed up beforehand.
Step 3: Download and Extract the Correct BIOS File
Estimated Time: 5 minutes
Go to the official website of your motherboard manufacturer (such as ASUS, Gigabyte, MSI, or ASRock). Search for your exact motherboard model. Be extremely careful with revision numbers; a “Rev 1.0” motherboard may use a completely different BIOS file than a “Rev 2.0” version of the same board. Download the latest stable BIOS ZIP file. Extract the contents of the ZIP folder directly onto the root directory of your newly formatted USB drive. The file will typically have an extension like .CAP, .ROM, or a numerical sequence representing the version.
Step 4: Connect Diagnostic Hardware
Estimated Time: 5 minutes
If your computer case does not have a built-in speaker, plug an internal system buzzer—such as one from the SoundOriginal PC Motherboard Internal Speaker (3-Pack) (around $5) or the 5 PCS Motherboard Speaker set (around $4)—into the 4-pin speaker header on your motherboard (usually labeled ‘SPK’ or ‘SPEAKER’ near the front panel headers). This tiny hardware tool is invaluable; if the BIOS flash experiences an issue, the motherboard will emit specific patterns of beeps to tell you exactly what went wrong.
Step 5: Enter the BIOS/UEFI Interface
Estimated Time: 2 minutes
Keep the USB drive plugged in and restart your computer. As soon as the screen turns black and begins to boot, repeatedly tap the Delete key or the F2 key (depending on your brand) to enter the BIOS/UEFI setup screen. If your system boots directly into Windows, you may need to hold the Shift key while clicking “Restart” in the Windows Start menu, navigate to Troubleshoot > Advanced Options > UEFI Firmware Settings, and restart from there.
Step 6: Run the Built-In Flash Utility
Estimated Time: 10 minutes
Once inside the BIOS, navigate to the tool or flash utility. This is named differently depending on the brand: ASUS uses EZ Flash, MSI uses M-Flash, Gigabyte uses Q-Flash, and ASRock uses Instant Flash. Select the utility, locate your USB flash drive, and select the BIOS file you downloaded. The system will ask you to confirm that you want to update. Click “Yes.”
Crucial Rule: Once the progress bar begins, do not touch your mouse, keyboard, or power button. The system may reboot several times, and the screen may remain black for up to a minute between cycles. Let the process finish completely until you are booted back into the BIOS or your operating system.
Mistakes to Avoid
- Updating via Windows Software: Many manufacturers offer desktop software to update the BIOS from within Windows. Avoid this at all costs. Background programs, antivirus software, or a sudden Windows blue-screen crash can interrupt the process and ruin your motherboard. Always flash directly from within the UEFI/BIOS environment.
- Ignoring the Weather: Never update your BIOS during a thunderstorm, high winds, or utility maintenance windows. A sudden power flicker lasting only half a second can shut down your PC mid-flash, ruining the board if you do not have a UPS battery backup.
- Using the Wrong Revision File: Manufacturers often release multiple physical hardware revisions of the same motherboard model over its lifecycle. Installing a BIOS meant for Revision 2.0 on a Revision 1.1 board can cause an instant failure to boot.
- Pulling the USB Drive Out Early: Even if the progress bar hits 100% and the computer screen goes dark, leave the USB drive inserted. The motherboard may need to perform internal verification steps during the subsequent reboot cycle.
How Often Should You Update?
Unlike regular operating system security patches, you should not update your BIOS on a strict weekly or monthly schedule. The general rule of thumb for BIOS updates is: “If it isn’t broken, don’t fix it.”
You should only update your BIOS under three specific circumstances:
- You are installing a newly released CPU that requires a newer BIOS version to run on your existing motherboard.
- You are experiencing system instability, memory compatibility issues, or hardware bugs that the manufacturer’s patch notes explicitly state are fixed in the new release.
- A critical, high-severity security vulnerability has been discovered that requires a firmware-level patch.
For instance, as we look ahead to new processor architectures emerging in 2026, keeping an eye on stability updates will be important, but only apply them when you are ready to upgrade or if you encounter system errors.
When to Call a Pro or Replace
If you attempt an update and your PC fails to turn back on—meaning the fans spin at 100% but the screen remains completely black—you may have a corrupted BIOS. Before panicking, check if your motherboard has a physical feature called “BIOS Flashback” or “Q-Flash Plus.” This allows you to flash the BIOS using a USB drive plugged into a specific USB port on the back of the case, even if the motherboard cannot boot.
If your board does not support this feature, listen to the diagnostic beeps from your internal speaker. If you hear continuous beeps or a specific pattern of short and long beeps, consult your motherboard’s manual to identify the error. If troubleshooting fails, it is time to contact a professional computer repair technician. They have physical ROM burning tools that can clamp directly onto the motherboard’s BIOS chip to force-write the firmware. If the motherboard is an older, budget model (under $80), the cost of professional repair may exceed the value of the board, making a replacement the most practical choice.
FAQ
Can a failed BIOS update permanently ruin my motherboard?
Yes. If the BIOS chip is written with corrupted data or the power cuts out mid-process, the motherboard loses the basic instructions required to boot up and recognize hardware. Unless your motherboard has a physical recovery feature like Dual-BIOS or a BIOS Flashback button, it will be rendered unusable without professional hardware reprogramming.
Do I need a USB drive to update my BIOS?
While some modern motherboards allow you to download and flash the BIOS directly through an internet connection within the UEFI menu, using a formatted USB drive remains the safest, most reliable method. It eliminates the risk of network drops or router freezes interrupting the file transfer mid-flash.
How long does the BIOS update process take?
The actual writing of the new BIOS firmware typically takes between 3 to 10 minutes. However, you should allocate about 30 minutes in total to allow time for system identification, USB formatting, file verification, and post-update reboots.
Should I update to a “Beta” BIOS version?
Generally, no. Beta BIOS versions are released for testing purposes or to provide early support for unreleased hardware. They may contain bugs, memory training issues, or instability. Stick to fully validated, stable BIOS releases unless you are instructed to install a Beta version by a manufacturer’s support technician to resolve a specific issue.









