
A high-performance home office or gaming workstation is an investment in both productivity and interior style. However, when your processor reaches operating temperatures between 85°C and 95°C during intense tasks like 4K rendering, compiling code, or gaming, performance drops fast. Learning how to fix cpu overheating under load is essential for protecting your hardware and keeping fan noise from disrupting your quiet workspace.
When thermal management is handled poorly, severe problems arise. Pushing a CPU beyond its thermal limits triggers aggressive throttling, dropping clock speeds by up to 50% to prevent permanent hardware failure. Neglecting high thermal output can also transfer excess radiant heat onto solid-wood desk surfaces, potentially drying out fine wood finishes over time. Furthermore, incorrect repair attempts—such as over-tightening cooler mounting brackets, stripping delicate motherboard screws, using conductive household cleaners, or applying an excessive blob of thermal compound—can crack your CPU die, bend motherboard pins, or cause short circuits. Fixing this issue correctly requires a balance of internal hardware maintenance and smart spatial arrangement around your desk setup.
Our Top Picks

What You Need
Before opening your computer case, gather dedicated, non-conductive tools and thermal materials. Preparing your workstation beforehand prevents accidental drops or static damage to your internal components.
As an Amazon Associate we earn from qualifying purchases at no extra cost to you.

| Item | Why | Optional? |
|---|---|---|
| Non-Conductive Thermal Compound | Fills microscopic air gaps between the CPU heat spreader and cooler base plate to ensure optimal heat transfer. | No |
| 99% Isopropyl Alcohol & Microfiber Cloth | Dissolves dried thermal paste without leaving conductive residue or scratching polished metal surfaces. | No |
| Can of Compressed Air or Electric Duster | Clears compacted dust bunnies from radiator fins, intake meshes, and fan blades. | No |
| Precision Magnetic Screwdriver Set | Safely removes mounting screws without dropping metal fasteners onto sensitive circuit boards. | No |
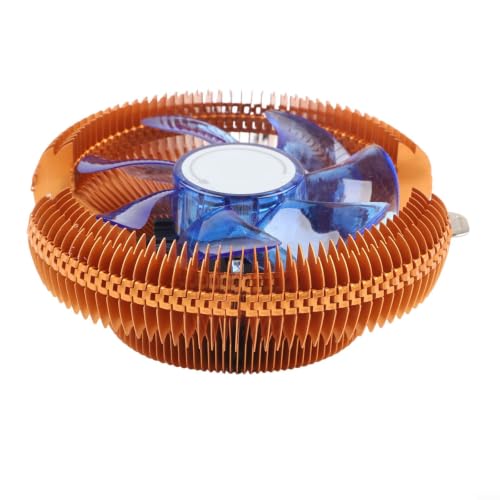
| Replacement Air Cooler (e.g., Aluminum Heat Sink Fan for AMD 775 1155 CPUs, ~$10–$15) |
Replaces damaged, noisy, or undersized stock coolers rated for low Thermal Design Power (TDP) chips. | Yes |
| Ventilated Computer Tower Stand (e.g., Hovadova Adjustable Mobile Stand, ~$15–$25) |
Lifts the chassis 2 to 4 inches off the floor to increase airflow to the power supply and lower intake vents. | Yes |
Step-by-Step
Step 1: Isolate the Workstation and Clear Space
Estimated Time: 10 minutes
Power down your computer completely and flip the power supply switch to the off position. Unplug all power cords, display cables, and USB peripherals. Move the computer tower to a flat, well-lit table lined with a non-static mat or soft towel to protect both the computer chassis and your tabletop finish. Remove the side panels to inspect internal dust accumulation and airflow paths.
Step 2: Deep-Clean Air Intakes and Heat Exchangers
Estimated Time: 15 minutes
Dust acts as an insulating blanket that traps heat inside your system. Hold fan blades stationary with a finger to prevent over-spinning—which can generate electrical back-feed and damage motherboard headers—and blast compressed air through all cooling fins. Clean front-panel intake filters, top exhaust grilles, and lower power-supply intakes. Ensure you clean out dust trapped behind decorative front panels, as choked intake vents reduce internal air volume by up to 70%.
Step 3: Remove, Clean, and Repaste the CPU Cooler
Estimated Time: 20 minutes
Unscrew the thermal heatsink using a cross-pattern (loosening opposite corners incrementally) to avoid uneven pressure on the CPU socket. Gently twist the cooler back and forth to break the seal of old thermal compound; never pull straight up abruptly. Saturate a microfiber cloth with 99% isopropyl alcohol and wipe away all dried grey paste from both the CPU heat spreader and the cooler baseplate until the metal shines.
Apply a pea-sized dot (about 4 to 5 mm in diameter) of fresh thermal compound directly onto the center of the CPU. Do not manually spread it; the clamping pressure of reattaching the cooler will spread the paste evenly without trapping air bubbles.
Step 4: Upgrade or Reseat the Heatsink Assembly
Estimated Time: 15 minutes
If your factory cooler cannot handle continuous workloads, replace it with a more capable thermal unit. For budget builds or standard desktop upgrades, an entry-level air cooler—such as an Aluminum Heat Sink Fan for AMD 775 1155 CPUs (priced around $10)—delivers steady cooling performance for CPUs drawing 65W to 95W of power. Line up the mounting pins or backplate screws carefully, pressing firmly in a diagonal cross-pattern until secure. Reconnect the 4-pin PWM fan connector to the motherboard’s designated CPU_FAN header.
Step 5: Elevate and Reposition the PC Chassis
Estimated Time: 10 minutes
Placing a computer tower directly on carpet or tucking it inside an enclosed wooden desk cabinet severely restricts air intake. To maintain cool intake temperatures, set your tower on an elevated platform like the Hovadova Adjustable Computer Tower Stand (around $16). This mobile holder adjusts from 8 to 12 inches wide, accommodates heavy PC cases up to 60 lbs, and lifts bottom power supply intakes 3 inches off floor level. Maintain at least 4 to 6 inches of open space between the rear exhaust fans and any wall or furniture panel to prevent recycled hot air from circulating back into the intake vents.
Step 6: Configure Fan Curves in BIOS
Estimated Time: 15 minutes
Re-plug your computer, boot up, and enter the system BIOS by pressing the Del or F2 key. Locate the hardware monitor menu and select custom fan curves. Set system fans to ramp up to 100% duty cycle once CPU temperatures exceed 75°C. This proactive fan ramp ensures maximum heat dissipation before internal ambient temperatures spike under sudden computational loads.
Mistakes to Avoid
- Excessive Thermal Paste Application: Spreading half a tube of thermal paste acts as an insulator rather than a conductor and risks leaking conductive material onto socket pins.
- Over-tightening Mounting Screws: Excessive torque can flex the motherboard PCB, sever trace lines, or strip socket threads. Hand-tighten until firm resistance is met.
- Enclosing the Tower in Furniture Cubbies: As modern home office design shifts in 2026 toward compact, minimalist furniture, hiding a PC inside a solid cabinet without active exhaust fans creates a heat trap that degrades components.
- Using Vacuum Cleaner Nozzles Internally: Household vacuum nozzles generate static charges that easily blow static discharges onto delicate circuit traces. Stick strictly to canned air or anti-static blowers.
How Often
Perform basic thermal maintenance on a predictable schedule to keep your system running cool under load:
- Every 3 Months: Remove and wash external mesh dust filters. Spray canned air through front intake grills.
- Every 6 to 12 Months: Remove side panels for a thorough internal cleaning, removing dust built up inside heatsink fins and power supply shrouds.
- Every 2 to 3 Years: Replace dried-out CPU thermal paste with fresh non-conductive compound to maintain low thermal resistance.
When to Call a Pro or Replace
If your CPU continues to reach 90°C or higher under load after repasting and cleaning, evaluate your hardware configuration. Closed-loop All-In-One (AIO) liquid coolers can suffer from pump motor failure, internal fluid evaporation, or gunk buildup after 3 to 5 years of operation. If you feel no vibration from the pump tubes while the system is running, the cooler needs to be replaced immediately.
Additionally, modern processors consuming over 125W to 250W under maximum load require high-capacity dual-tower air coolers or 240mm+ liquid radiators. If your motherboard has bent socket pins or damaged electrical headers, consult a certified technician or upgrade the hardware rather than risking damage to new components.
FAQ
What is a normal CPU temperature under heavy load?
Ideal operating temperatures under maximum load range between 65°C and 80°C. Brief spikes up to 85°C during intense rendering workloads are acceptable, but consistent temperatures above 90°C indicate insufficient cooling, inadequate airflow, or dried thermal paste that requires attention.
Can a bad desk layout cause my CPU to overheat?
Yes. Placing a PC tower inside a solid cabinet, pushing exhaust ports tight against a wall, or resting the case on deep-pile carpet starves intake fans of fresh air. Maintaining 4 to 6 inches of clearance around all sides ensures continuous fresh air circulation.
Do I need expensive liquid cooling to fix overheating?
Not necessarily. High-quality air coolers handle high heat output effectively at a lower cost and with fewer points of failure than liquid systems. Liquid cooling is primarily beneficial for heavily overclocked high-end processors that consistently pull high wattage under sustained workloads.
How does elevated mobile CPU stands help lower temperatures?
Elevated stands raise bottom air intakes off dusty floors, allowing the power supply and lower intake fans to pull in cooler air without clogging dust filters. They also eliminate thermal insulation caused by thick floor carpeting, keeping interior temperatures lower overall.









