
Enabling faster RAM sounds simple until your new gaming kit boots at half its advertised speed. Most DDR4 and DDR5 memory defaults to a conservative JEDEC speed like 2133MT/s or 4800MT/s for compatibility, so without enabling its XMP (or EXPO) profile you are leaving 15 to 30 percent of your memory bandwidth unused. Set it up wrong and you get worse problems: random game crashes, Blue Screens, corrupted saves, a PC that will not POST and forces a BIOS reset, or RAM running at 1.35V without proper stability testing that silently creates errors. The good news is that configuring an XMP profile correctly takes about five minutes in the BIOS when you follow the right sequence and verify it afterward.
Our Top Picks
 CORSAIR Vengeance LPX DDR4 RAM 32GB2 count (pack of 1)5.32 x 0.28 x 1.32 Inches0 PoundsCheck on Amazon
What You Need
| Item | Why | Optional? |
|---|---|---|
| Compatible motherboard and CPU | XMP is an Intel standard, EXPO/ XMP 3.0 is supported on most modern AMD and Intel boards from 2026. Check your motherboard QVL list to confirm the RAM model is validated. | No |
| DDR4 or DDR5 RAM kit rated for XMP/EXPO | Example: 32GB kits (2x16GB) like DDR4-3200 CL16 or 64GB kits (2x32GB) like DDR5-6000 CL36. DDR4 modules are typically 133.35mm wide, 31-35mm tall for low-profile kits, and weigh 60-80g per pair. DDR5 U-DIMMs are similar in size, around 133.35mm x 31-45mm, weighing 70-90g per pair. | No |
| System power and stable PSU | XMP raises DRAM voltage to 1.35V – 1.45V. A reliable 550W to 850W PSU for most gaming rigs prevents voltage droop during memory training. | No |
| USB flash drive (8GB or larger) | For updating BIOS if your board needs a newer version to support higher memory speeds. | Yes |
| Notepad or phone camera | To record original BIOS settings and profile timings before you change anything. | Yes |
Step-by-Step
Work on a hard, non-conductive surface and shut down fully before entering BIOS. These steps cover both Intel XMP and AMD EXPO systems, which use the same menu flow.
As an Amazon Associate we earn from qualifying purchases at no extra cost to you.


Step 1: Confirm Your Current RAM Speed – 2 minutes
Before changing anything, see what speed you are actually running. In Windows, press Ctrl + Shift + Esc to open Task Manager, go to Performance > Memory, and note the Speed. Alternatively, download CPU-Z and check the Memory tab. Frequency shown there is half the advertised rate because it is DDR (Double Data Rate). For example, 1600MHz in CPU-Z equals 3200MT/s. If you bought a 3200MT/s or 6000MT/s kit and it shows 2133MT/s or 4800MT/s, XMP is not yet enabled.
Step 2: Verify Physical Installation – 3 minutes
Power off, switch off the PSU, and check that your modules are in the correct slots for dual-channel. Most ATX and micro-ATX boards want slots A2 and B2, which are the second and fourth slots from the CPU. Using the wrong slots can prevent XMP from posting at full speed. Modules should click firmly and the side latches should be fully closed. For a 2-stick kit like a 32GB (2x16GB) DDR4 set or a 64GB (2x32GB) DDR5 set, do not mix with older sticks of different speed or voltage.
Step 3: Enter BIOS/UEFI – 1 minute
Restart your PC and repeatedly press the BIOS key as it boots. Common keys are Delete or F2 for ASUS, MSI, and Gigabyte, and F12 or Delete for ASRock. If you miss the timing, go to Windows Settings > System > Recovery > Advanced startup > Restart now > Troubleshoot > Advanced options > UEFI Firmware Settings.
Step 4: Locate the XMP/EXPO Setting – 2 minutes
In the BIOS, look on the main Easy Mode screen or under Overclocking, Ai Tweaker, OC Tweaker, or DRAM Settings. Intel boards label it XMP, XMP 3.0, or A-XMP. AMD boards from the last few generations may label it EXPO, A-XMP/EXPO, or DOCP on ASUS boards. The setting is usually near the top and shows Disabled by default with Profile 1 and sometimes Profile 2 as options.
Take a photo of your current settings before you change anything so you can revert if needed.
Step 5: Enable the Correct Profile – 1 minute
Select Profile 1. This will automatically apply the rated speed, timings, and voltage from the memory’s SPD chip. For example:
- CORSAIR Vengeance LPX DDR4 32GB (2x16GB) 3200MHz: Sets to 3200MT/s, timings 16-20-20-38, voltage 1.35V. Street price typically ranges from $70 to $110 for this class in 2026, though higher-capacity binned kits list around $240-$260.
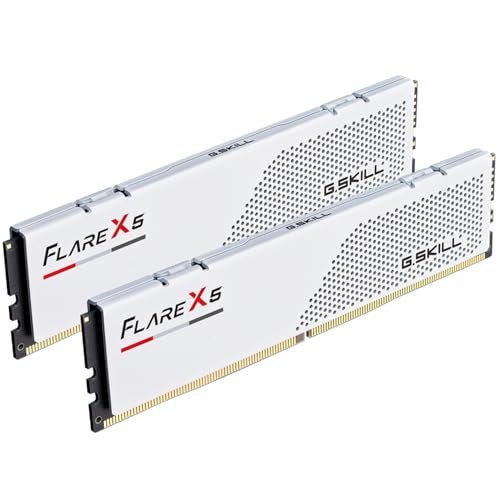
- G.SKILL Flare X5 DDR5 64GB (2x32GB) 6000MT/s: Sets to 6000MT/s, timings 36-36-36-96, voltage 1.35V. High-capacity DDR5-6000 kits of this type typically range from $180 to $280, with premium white or heavily binned versions listed up to $900-$1,100.
If your kit offers two profiles, Profile 1 is usually the fully tested speed, while Profile 2 may be a lower fallback or tighter timings. Start with Profile 1.
Confirm the DRAM Voltage changed to the value on the kit label, usually 1.35V for both examples above. Do not raise it manually beyond that unless you are experienced with overclocking.
Step 6: Confirm Memory Frequency and Save – 1 minute
Double-check that the displayed memory frequency matches the kit rating. Some BIOS menus show a target frequency after enabling XMP. Press F10 to Save and Exit, then confirm Yes. The system will reboot and perform memory training, which can take 30 seconds to 2 minutes with DDR5. The screen may go black briefly or restart twice; this is normal.
Step 7: Verify Speed in Windows – 2 minutes
Once back in Windows, reopen Task Manager > Performance > Memory or CPU-Z > Memory. You should now see the advertised speed: 3200MT/s for DDR4-3200 or 6000MT/s for DDR5-6000. Check that the timings match the label as well. If it still shows the old speed, return to BIOS and ensure the profile saved correctly.
Step 8: Stress Test for Stability – 15 to 30 minutes
Do not skip this test, especially for gaming. Run a memory stability tool such as TestMem5, HCI MemTest, or the built-in Windows Memory Diagnostic, and play a demanding game for at least 20 minutes. If you see crashes, freezes, or errors, the profile may need a small adjustment or a BIOS update. A stable profile should complete one full test run with zero errors and no game crashes.
Mistakes to Avoid
The most common error is mixing kits. Buying one 16GB stick now and adding a matching-looking stick later, even with the same speed rating, often fails to run XMP because the chips underneath are different. Always buy a single matched kit with the total capacity you need.
Another mistake is forgetting to update BIOS. Many DDR5 boards shipped before high-speed kits were common need a BIOS update to run 6000MT/s and above reliably. Check the motherboard support page for a version noting improved memory compatibility before assuming the RAM is faulty.
Do not manually tighten timings or raise voltage beyond the profile without knowing what you are doing. Raising DRAM voltage from 1.35V to 1.50V can help stability on some kits but generates more heat and can void warranties if done carelessly. Over-volting beyond 1.45V for DDR4 or 1.50V for DDR5 without proper cooling is not recommended for daily gaming use.
Avoid using four modules when you can use two. Two DIMMs place less load on the memory controller and are far more likely to reach the advertised XMP speed than four. If you need 64GB, a 2x32GB kit will almost always be more stable than 4x16GB.
Finally, do not enable XMP and ignore the failure to POST. If the system beeps, shows a DRAM debug LED, or loops three times and reverts, let it revert to safe defaults, then try again with the other profile or enable XMP with the frequency set one step lower, such as 5600MT/s instead of 6000MT/s.
How Often
You only need to set an XMP or EXPO profile once. It stays enabled until you clear CMOS, update BIOS, or change RAM. Re-check after any BIOS update because some updates disable XMP and return to JEDEC defaults. If you change your CPU or motherboard, you will need to re-enable and re-test the profile. For routine gaming, there is no need to toggle it on and off; leave it enabled after you have verified stability. Check speed once every few months or if you notice a performance drop after a system update.
When to Call a Pro or Replace
Call a professional or contact the motherboard or memory maker if the system will not POST with XMP enabled after trying both profiles, a BIOS update, and reseating the RAM in the recommended slots. A technician can test modules one at a time, check for a bent CPU socket pin, or adjust system agent voltages that are not safe to guess at.
Consider replacing RAM if it cannot run at its rated speed even at 1.35V after testing in another compatible system, if you see persistent memory errors at JEDEC speeds, or if modules are physically damaged or run excessively hot. DDR4 modules typically draw 3 to 5 watts per stick at XMP, DDR5 draws 5 to 10 watts per stick, and while warm to the touch is normal, burning-hot heat spreaders indicate poor case airflow. If you need more performance than your current board supports, for example trying to run DDR5-7200 on a board rated for 6000MT/s, you may need a platform upgrade rather than a new RAM kit.
FAQ
Is XMP safe for daily gaming?
Yes, when using the profile programmed by the manufacturer. Running 3200MT/s at 1.35V or 6000MT/s at 1.35V is the intended use and is covered by warranty for most major brands. It is factory overclocking that has been tested to the timings printed on the label. Problems only arise when you push voltage or frequency beyond that profile without stability testing.
Why does my BIOS show XMP on Intel but EXPO or DOCP on AMD?
They do the same job. XMP 3.0 is Intel’s naming, EXPO is AMD’s extended profile for DDR5, and DOCP is ASUS’s term for running XMP timings on an AMD board. If you have a G.SKILL Flare X5 kit labeled AMD EXPO and Intel XMP 3.0, you can use either depending on your platform. Just enable the profile that appears on your board.
Will enabling XMP improve FPS?
It reduces stutter and improves average FPS in CPU-bound games, often by 5 to 20 percent compared to JEDEC defaults, because the CPU can feed data faster. The gain is largest at 1080p with a powerful GPU. At 4K, the GPU is usually the limit, so the uplift is smaller but still helps with minimum frame rates and loading.
What if my PC will not boot after enabling XMP?
Power off and clear CMOS. Most boards have a Clear CMOS button on the rear I/O or two pins near the battery labeled JBAT1 or CLRTC. Short the pins for 10 seconds with a screwdriver while powered off, or remove the coin-cell battery for 5 minutes. The system will boot at defaults so you can try the secondary profile or a slightly lower frequency.









