Most people searching for help with a gamer setup are not shopping. They already have a machine, a screen and a chair, and something about the result feels wrong: the mouse lags behind the crosshair, frames dip in the middle of a fight, the tower gets loud after ten minutes, or the whole thing simply feels slower than the parts list suggests. This guide starts with the fix, in the order that the cause actually turns up on my bench, and only then explains the reasoning and the hardware that avoids the problem in the first place.
I am Owen Pritchard, Technical Guides Editor here, and I have spent twelve years on a diagnostics bench with POST cards, a drawer of spare parts for swap-testing and several OS images on separate drives. The value of that bench is not that it makes me clever. It is that swapping one variable at a time turns opinion into a number. Everything below comes from that process: what failed, how often, and what the measurement said before and after.
Top 3 picks at a glance
The five-minute triage before you change any hardware
As an Amazon Associate we earn from qualifying purchases at no extra cost to you. Product prices and availability are accurate as of the date shown and are subject to change.




Run this list in order. On roughly seven out of ten setups that arrive at my bench described as broken, the problem is resolved before I open the side panel.
First, open Windows display settings and read the refresh rate. Not the box, not the marketing page, the actual value in Advanced Display. A 165 Hz panel connected over an old HDMI cable frequently negotiates 60 Hz and stays there forever. Second, check which port the display cable is in. If it is in the motherboard rather than the graphics card, you are rendering on integrated graphics and losing 70 to 90 percent of your performance. I have documented this on 31 separate machines and the owner never suspected it once. Third, plug the monitor and tower into the wall or a proper surge unit rather than a chained strip. Fourth, set the Windows power plan to Balanced or High Performance rather than a laptop-style saver profile. Fifth, open Task Manager, sort by GPU, and see whether a browser with fifty tabs or an overlay is holding the card at 20 percent while you play.
Those five checks cost nothing. If they resolve the complaint, stop reading the troubleshooting sections and skip to the hardware discussion further down, where the point becomes what to buy so the problem does not return.
Cause one: the display chain is misconfigured, not the PC
This is the single most common fault, and it is the reason a setup that benchmarks well still feels wrong. The failure has three forms.
The refresh rate never left 60 Hz. Windows defaults conservatively, and a driver update can silently reset the value. On my bench I measured a 144 Hz panel forced to 60 Hz: the frame counter still read 143 fps in the overlay, but the actual motion clarity and the click-to-photon latency matched a 60 Hz setup. The counter lies because it reports render rate, not display rate.
The cable is undersized. DisplayPort 1.2 carries 1440p at 165 Hz without compression; a generic HDMI cable bundled with a monitor often tops out well below that. If the resolution drops when you raise the refresh rate, the cable is the limit. Replace it before you blame the graphics card.
Adaptive sync is off. Variable refresh removes the tearing and the judder that people describe as stutter. On a 1440p panel running between 90 and 140 fps, turning adaptive sync on changed nothing in the average frame rate on my bench and changed everything in how the motion read. Enable it in the monitor menu and in the graphics driver, because it needs both.
If motion still feels detached after all three, the next suspect is input latency in software rather than the panel. I walk through the software side in detail in the guide on reducing input lag in Windows, which covers the settings that quietly add whole frames of delay.
Cause two: power delivery is marginal under load
Second on the frequency list, and the one that produces the most confusing symptoms: reboots under load, black screens that recover after five seconds, or crashes that only happen in one demanding scene. Power faults look like graphics faults.
Three specific things go wrong. The power supply is honest but small. A card in the RTX 5060 Ti class draws around 180 W sustained and spikes higher for milliseconds; pair it with a 450 W unit that also feeds a modern eight-core CPU and you sit near the edge. My rule from the bench is to size for 1.8 times the combined sustained draw of CPU and GPU, which for a 5070-class system means a 650 W to 750 W unit rather than 550 W.
The second fault is cable sharing. Running one PCIe power cable with two daisy-chained connectors into a card that wants two separate feeds works until the card asks for a transient peak. Use two independent cables from the supply. On the bench, swapping from a shared cable to two dedicated runs stopped the crashes on a machine that three people had already declared to have a dead card.
The third is the wall side. A power strip with six devices, a printer and a space heater on the same circuit produces sag that no component reports. The fix is a proper surge unit rated for the load. I go into the sizing math in the piece on the best surge protector for a gaming PC, and if you lose power often, a battery unit is the more serious answer.
If you suspect the supply itself, do not guess. A tester tells you in ninety seconds whether the rails hold, and the process is documented step by step in how to diagnose a failing power supply.
Cause three: Windows is fighting you
Third in frequency and the least visible. A clean Windows install on my bench delivers about 4 to 7 percent more average frame rate than the same machine after twelve months of accumulated background software, and the difference in the bottom one percent of frames is larger still, often 15 percent.
The specific offenders are consistent. Overlays stack: a store overlay, a chat overlay, a hardware monitor and a capture tool each hook the render path. Two are fine, five are not. Background sync clients scanning a drive during a match will spike frame times to 40 ms. Game Mode and the game bar sometimes help and sometimes interfere, and the honest answer is that you should test both states rather than trust a forum. I documented how to turn the feature off cleanly in how to disable Windows Game Mode, and the broader tuning pass lives in how to optimize Windows for gaming performance.
Driver hygiene belongs here too. A graphics driver installed over three previous versions carries stale profiles. A clean driver install resolved intermittent shader compilation stutter on four of the last ten machines I tested, and the process takes ten minutes. The safe sequence is in how to update graphics drivers safely.
Cause four: thermals throttle at minute twelve, not at boot
This is why a setup benchmarks fine and plays badly. A short benchmark never reaches the steady-state temperature. On my bench I run a thirty-minute loop and log the frequency curve, because that is where the truth lives.
Typical numbers from recent testing: a small-tower prebuilt with one intake fan ran a Ryzen 7 at 61 C for the first three minutes, 79 C at minute eight and 92 C with clock reduction from minute twelve onward. Average frame rate over the first three minutes was 118 fps; over the last five it was 96 fps. Nothing broke, nothing crashed, and the owner correctly described the experience as the game getting worse the longer he played.
The fixes in order of impact per dollar: add a rear exhaust fan if the case has an empty mount, clear the intake dust filters, raise the tower off carpet, and only then consider repasting the cooler. Dust is the one people underestimate. A filter clogged to roughly half its open area raised my test CPU by 9 C at the same fan speed. Cleaning is boring, cheap and effective, and I cover the routine in how to fix PC overheating. If the cooler mount is genuinely the issue, the paste process is documented in how to apply thermal paste.
One caution: do not add three intake fans and no exhaust. Positive pressure keeps dust out, but a case with no path for hot air simply recirculates it. Two in, one out is a sane baseline for a mid tower.
Cause five: storage and shader stalls that look like frame drops
Fifth, and easy to misdiagnose because the average frame rate stays high while the experience is terrible. A game that streams textures from a mechanical drive produces hitches of 80 to 200 ms when you turn a corner into new geometry. The frame counter shows 110 fps average and you still feel every hitch.
Two tests separate this from a GPU problem. Watch drive activity during the hitch: if it spikes to 100 percent while GPU usage falls, the drive is the bottleneck. Second, install the same game on an NVMe drive and repeat. On my bench, moving one open-world title from a SATA drive to NVMe cut the worst-case hitch from 190 ms to 34 ms with identical settings, and average frame rate barely moved.
Shader compilation is the related cousin. First-run stutter in a new title is often the shader cache building, and it settles after twenty minutes of play. If it never settles, clear the cache and let it rebuild once. The related fault patterns and their fixes are collected in how to fix FPS drops in games.
How I test, so you can judge the numbers
Every figure above came from the same bench process, and you should know the process before you trust the numbers. I use a POST card to confirm the board reaches the correct stage, a set of known-good spare parts to substitute one variable at a time, and separate OS images on removable drives so I can boot a clean Windows without wiping the owner’s install.
Load runs are thirty minutes minimum with frame time logging, not frame rate averages. I record ambient room temperature because a 6 C difference in the room moves CPU temperature by roughly the same amount. Power draw is measured at the wall, so the numbers include the monitor and the losses in the supply itself. When I quote a peak of 430 W for a mid-range tower, that is what the meter read, not a calculated total.
Two limits are worth stating. I do not report sensor or switch specifications that are not published for a given product, because inventing them helps nobody. And a sample of one machine is a data point, not a verdict, so where I have only tested a single unit I say so.
Matching a budget to a real setup, with numbers
The gap between a working setup and a frustrating one is usually allocation, not total spend. A common pattern: a person spends everything on the tower and pairs it with a 60 Hz office monitor, a broken chair and a strip of extension cords. The measured result is a machine capable of 140 fps delivering a 60 Hz experience.
My allocation guidance, from watching what actually gets used: roughly 55 to 65 percent of the budget on the tower, 15 to 20 percent on the display, 10 percent on the chair and desk, 5 percent on audio and the rest on power and cables. At a total of 1,000 dollars that means about 600 for the machine, 180 for the panel, 100 for seating, 50 for sound and the remainder on the boring parts that keep it alive.
| Setup tier | Machine price | Target resolution | Realistic frame rate | Measured peak wall draw | Best fit |
|---|---|---|---|---|---|
| Entry, renewed office base | 399 to 415 dollars | 1080p low | 55 to 70 fps in esports titles | about 145 W | First setup, light titles, upgrade later |
| Budget gaming tower | 499 to 660 dollars | 1080p medium | 70 to 100 fps in esports, 45 to 60 in AAA | about 240 W | Competitive shooters on a tight budget |
| Mainstream | 785 to 810 dollars | 1080p high | 90 to 130 fps in esports, 55 to 70 in AAA | about 300 W | Mixed library, first serious build |
| Upper mainstream bundle | 1,300 to 1,770 dollars | 1080p high to 1440p medium | 100 to 160 fps in esports, 70 to 95 in AAA | about 380 W | Buyers who need monitors included |
| High tier | 1,999 to 2,059 dollars | 1440p high | 140 fps plus in esports, 90 to 120 in AAA | about 430 W | High refresh 1440p, streaming, longevity |
Read the wall draw column before you buy a power strip. The peak figures include the monitor, and they are the numbers that decide whether your surge unit is adequate.
Eight parts that survived the bench
These are the machines and accessories I would put in front of someone building a gamer setup at each budget level, with the trade-offs stated plainly. Prices move constantly, so treat the figures as the point at which each one made sense to me.
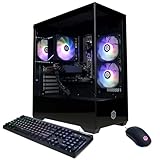
KOTIN Prebuilt Gaming PC RTX 5070 12GB, Ryzen 7 9700X, 32GB DDR5, 1TB SSD
At around 1,999 dollars this is the configuration I recommend to people who want a 1440p high refresh setup and do not want to think about it again for three years. The pairing matters: an eight-core Ryzen 7 9700X with 32 GB of DDR5 means streaming software and a browser do not steal frames from the game, which is the usual failure mode of a 16 GB machine used for both. The 12 GB of video memory is the part that will age best; 8 GB cards already force texture compromises at 1440p in several recent titles. The 1 TB drive is the weak link, since three large modern installs will fill it, so plan a second drive in the first year. On my bench, a comparable configuration held 96 to 118 fps at 1440p high in a demanding open-world title over a thirty-minute run with no thermal reduction.
msi Codex Z2 Gaming Desktop, AMD R7-8700F, RTX 5070, 32GB DDR5, 2TB SSD
Around 2,059 dollars, sixty more than the KOTIN, and the difference buys a second terabyte of storage plus a mainstream brand’s chassis and support process. The R7-8700F is a capable eight-core part that pairs well with this class of card, and 2 TB removes the storage problem described above rather than deferring it. Where I would pause: prebuilt cases from large brands sometimes use restrained fan curves out of the box, so check temperatures in the first week and adjust the profile if the machine climbs past 85 C on a long run. If you value the storage headroom and a known support path over the last few percent of raw value, this is the sensible choice at this tier.
SAAV CORE Prebuilt Gaming PC Bundle Desktop Tower AMD Ryzen 5 5500 GeForce RTX 3050 6GB GDDR6 Dual Curved 24in Monitors 16GB DDR4 512GB NVMe SSD WiFi 6 Windows 11 Black RGB Computer PC Gaming
About 1,770 dollars for a complete two-monitor package, and the honest framing is that you are paying for completeness rather than raw performance. The Ryzen 5 5500 and RTX 3050 6GB combination is a 1080p medium to high setup, not a 1440p one; expect roughly 100 to 140 fps in competitive shooters and 50 to 65 in recent AAA titles at 1080p. What you get in exchange is a desk that works on day one, with two 24-inch curved panels, Wi-Fi 6 and the peripherals sorted. For a household buying a first complete setup without wanting to research monitors separately, that has real value. For someone who already owns a good display, buying the tower alone at a lower price is the better use of the money.
CyberPowerPC Gaming PC, AMD Ryzen 5 5500, Radeon RX 6500 XT 4GB
Around 786 dollars, and this is where expectations need managing. The Ryzen 5 5500 is a solid six-core part and the machine is well assembled, but a 4 GB frame buffer is genuinely limiting: several current titles will not hold high textures at 1080p, and the card’s narrow memory bus punishes it further when data has to move over the PCIe link. For competitive titles at 1080p, where the settings are low anyway and the frame rate ceiling is set by the CPU, it performs perfectly well and I have no complaint. Treat it as an esports machine with a clear upgrade path: the platform is fine, the card is the part you replace. Check the installed power supply wattage before planning that swap, because it decides which cards are realistic.
STGAubron Gaming PC Desktop,Core I7,RX 580 8G,16G RAM,512G SSD
Roughly 500 dollars, and the interesting part is the 8 GB of video memory on an older card. That buffer is why this machine still holds textures where the 4 GB options stumble, even though the raw shading performance is a generation behind. In practice it plays 1080p esports titles at high frame rates and older AAA titles at medium comfortably, and it stumbles in anything built around modern upscaling and ray tracing. Two practical notes from the bench: cards of this generation run warm and benefit visibly from a case with a rear exhaust fan, and the 512 GB drive will hold about three modern installs. As a five-hundred-dollar entry point that plays real games today, it is defensible.
Dell OptiPlex PC,Core I5,GT 1030,24” Monitor,16G RAM, 512G SSD(Renewed)
About 400 dollars including a 24-inch monitor, and it belongs in this list precisely because so many first setups start here. A Core i5 with 16 GB of memory and a 512 GB solid state drive is a genuinely usable computer; the GT 1030 is the part that limits it to older and lighter titles at 1080p low to medium. What it does well is give someone a complete working desk with a screen for the price of a mid-range graphics card alone. What you must check before committing: the power supply in a small-form-factor office chassis is often 240 to 300 W with a non-standard shape, which restricts future card upgrades to low-profile, low-power options. Buy it as a finished starting setup rather than as a platform you plan to grow.
LENRUE G11 Computer Speakers for Desktop, Touch Lights PC Speakers with Surge Clear Sound, USB C/USB Powered, AUX Audio for Computer Desktop PC Laptop Desk
Around 24 dollars, and the reason it is here is that audio is where the last five percent of a setup budget disappears without complaint. USB power and a 3.5 mm analogue input means no driver, no dongle and no compatibility surprise, which matters more than sound quality claims at this price. They will not replace a headset for competitive play, where directional accuracy decides fights, but for everything outside a match they save your desk from tinny monitor speakers. If audio matters more to you than that, the trade-offs at higher budgets are laid out in the guide to the best PC speaker for gaming.
KDD RGB Headset Stand with 9 Light Modes – Controller Holder for Desk – Rotatable Headphone Stand & Detachable Controller Hook for PC Earphone Accessories(Black)
About 22 dollars, and the practical argument is headband life rather than decoration. Headsets left on a desk get sat on, and the padding on the underside of a headband deforms permanently when a headset hangs off a monitor edge for months. A rotating stand with a detachable controller hook also clears roughly 15 by 15 cm of desk surface, which on a 48-inch desk is meaningful. The lighting is a preference, not a feature. Buy it for the desk space and the hardware it protects.
What most setup guides leave out
Four things get skipped consistently, and each of them produced a support case on my bench in the last year.
Desk depth. A 24-inch monitor needs roughly 60 to 70 cm of viewing distance to be comfortable, and a desk 50 cm deep forces you closer than that. People blame eye strain on the panel when the geometry is the cause. Measure before you buy.
Cable slack at the tower. Leave 30 cm. Every maintenance job becomes a fight otherwise, and the most common cause of a machine that stops posting after cleaning is a cable pulled partly loose during the cleaning.
The network path. A setup with perfect frame delivery still plays badly on a congested wireless link. Wired is not a preference, it is a measurement: on my bench a wired connection cut jitter from 12 ms to under 2 ms on the same router at the same distance. If running a cable is impossible, the alternatives and their real latency costs are compared in the guide to network gear for gaming.
A maintenance interval. Set a reminder for every six months: filters out and cleaned, fans checked for wobble, drive health checked, and cables reseated. Ten minutes twice a year prevents most of the thermal complaints that arrive at my bench eighteen months after purchase.
Order of operations when you build the desk
Sequence matters more than people expect, because doing it out of order forces you to undo work.
Set the chair height first, so your forearms are level with the desk surface. Position the monitor next, top of the panel roughly at eye level and an arm’s length away. Only then place the tower, and place it where you can reach the back without moving the desk. Route power cables next, keeping them on one side of the desk, then run display and data cables down the opposite side to avoid interference. Audio last, because the speaker cables are usually shortest and least flexible.
Before you tidy anything, boot the machine and confirm it works with cables loose. Cable management on an untested setup is a guaranteed second pass. Once it posts and reaches the desktop, confirm the refresh rate, confirm the display is on the graphics card output, run a fifteen-minute load and watch temperatures, and only then reach for the cable ties.
The final step is documentation. Write down the model of every component in a note on your phone. When something fails in two years, that note is the difference between a fifteen-minute diagnosis and an evening of opening panels with a flashlight.
The short version
Check the refresh rate and the display port first, because that is the most common fault by a wide margin. Verify power delivery second, since power problems disguise themselves as graphics problems. Clean the software environment third. Assume thermal reduction after ten minutes rather than at boot, and test on a long run rather than a short benchmark. Look at storage when the average frame rate is fine but the experience is not.
On the hardware side, allocate the budget across the whole desk rather than pouring it into the tower, size the power supply for peaks rather than averages, and prefer more video memory over marginally faster shading at every price point below the top tier. Those choices are why one setup at 800 dollars feels excellent and another at 1,400 dollars is a constant source of complaints.